Gals, thrifting for plus sizes works when you stop shopping by tag size and start shopping by garment measurements. Check the "wrong" sections first — the men's, maternity, and coats areas hide the best plus-size finds — then run a quick buy-or-leave checklist on seams, elastic, and zippers before you commit. That is the whole system in one breath, and the rest of this post is the step-by-step version.
Most thrifting advice was written for straight-size shoppers and adjusted later. MY system was built on a plus-size body, in real stores, with a tape measure in my purse. It assumes the plus rack will be small, the sizes will be unreliable, and the good stuff will be hiding somewhere it does not belong. Once you plan for that, thrifting gets fun again.

Why thrifting is harder in plus sizes — and why it is worth it
Start with the honest part. The plus-size section in most thrift stores is a fraction of the women's department, and it gets picked over fast because plus shoppers know how rare a good find is. Sizing is total chaos on top of that. A 16 from 1998, a 16 from last year, and a juniors XL are three completely different garments, and they are all hanging on the same rack pretending to be the same size.
Here is why I keep going back anyway. Older plus-size clothing was often built better than what stores sell now — real cotton, wool, lined blazers, seams that hold. Premium plus brands land on thrift racks for a few dollars, and low prices let you experiment with a style you would never pay retail to test. Store size matters less than you would think, too. As I said in I Went to the Biggest Goodwill in Texas: "I really like my smaller Goodwills. They have better prices, and I find better stuff." The giant stores are fun for a day trip. The little neighborhood stores are where my wardrobe actually comes from.
Before you go: the 10-minute prep
Ten minutes of prep at home saves an hour of guessing at the store. Here is the routine:
Know your three measurements. Bust, waist, and hip, in inches, saved in your phone's notes app. Brands size however they want. Your measurements are the one number that never changes its story between stores.
Bring a soft tape measure. The flexible sewing kind, not the hardware-store metal one. Measure garments’ waistbands or pit-to-pit, and compare against your numbers.
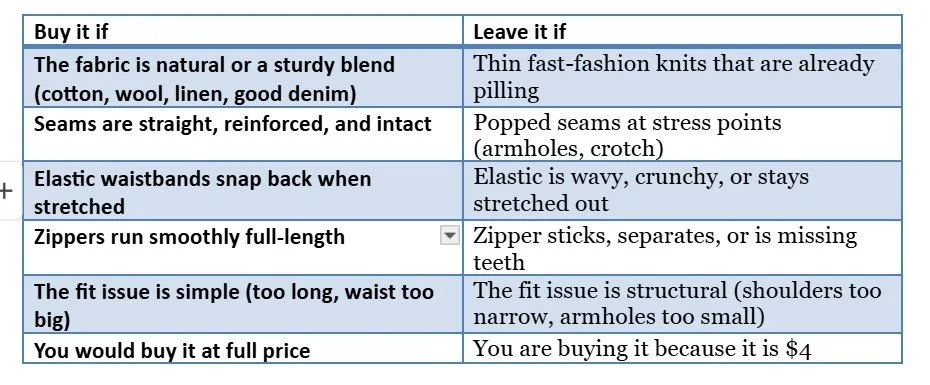
Screenshot the buy-it-or-leave-it checklist. It is further down this post. Having it on your phone means you use it when a $4 price tag starts talking you into something you don’t need.
Wear leggings and a fitted tank. This is your portable fitting room. You can pull a dress or a sweater on right in the aisle, no line, no six-item limit, no sad little curtain. And since most dressing rooms are non-existent after 2020, trying on in the aisle is usually a necessary evil.
Set a budget and make a list. My list usually reads something like "blazers, dark denim, one statement piece." A list keeps the trip focused, and a budget stops the cart-fill that happens when everything is cheap. If your store runs tag-color sales, check which color is half off this week before you go, so the sale works with your list instead of rewriting it.
The store walk-through: which sections to check first
Work the store in this order, every time. The sequence matters because the best plus-size density is rarely in the plus-size section. Crazy, I know! Take a look at the section’s size and gender category, but don’t let it trip you up. People are constantly putting things in the wrong spot, and sometimes the wrong spot is the perfect place to find awesome pieces.
The men's section. As I put it in Thrift Haul Under $65: "Do not skip the men's section. I find the best stuff in the men's section." That is not hype, either. I consistently find gems in the men’s section, like my 100% Egyptian cotton button-down and my amazing collection of suit jackets. My favorite find was a tuxedo jacket in the men’s section at a tiny store in San Francisco. Button-downs, blazers, sweaters, and flannels all run larger here, and the fabric quality is often better than the women's rack at the same price.
Coats and jackets. This wall has the highest concentration of plus sizes in most stores. Coats get donated in good condition, they are forgiving on fit, and an oversized coat reads as a style choice. I love a good oversized jacket!
The wrong sections. Maternity racks hide empire waists and stretch panels that work beautifully on plus bodies. Juniors XL usually fits like a 14/16, whatever the tag claims, so you can find good stuff in the teen section, too.
Pants and skirts. Don’t be afraid of searching through several different size categories. Remember, you may fit into five different sizes, depending on the brand, the cut, and when it was made. I can wear anything from a size 16 to a size 24! Remember, higher rises are your friend for sitting, bending, and actual life.
Tops and dresses: The best finds are always in the wrong size section. Make sure you cruise through all of the dresses. Keep an eye on the tag as you sort to determine if it may be worth taking it off the rod for a closer look. Remember, you can probably fit into several different sizes, so don’t automatically nix a dress that’s a size or two off from what you normally wear.
Bedding and linens: If you sew, head over to the linens and curtains area — vintage tablecloths and curtain panels are cheap, wide, and often contain natural-fiber fabric. You can whip these items up into dresses, pants, skirts, and anything else you need. Sometimes you’ll find large, very nice scarves in this section that someone thought was a throw blanket.
Shoes and accessories last. This is where patience pays off in things like barely worn boots or a well-loved leather bag that can add some spice to your outfit. Let’s be honest, typically, plus-size clothes can be a little drab and need some spicing up.
Tips: Skip the fast-fashion rack by the entrance — it is the most picked-over real estate in the store — and skip anything with underarm discoloration or a broken zipper you cannot fix yourself. Cheap is not a bargain if it stays in the bag.
Also, find gems by feel. Run your hand down the rack and stop at fabrics with some weight and body — cotton, rayon with substance, wool blends, good denim, silk. I try to look for natural fibers whenever I can. Natural fibers feel better and last longer, which matters for clothes on their second owner.
The buy-it-or-leave-it checklist
Every maybe goes through this checklist before it goes in the cart. Seams, elastic, zippers, fabric, and one honest question at the end. Screenshot this table and keep it next to your measurements. It takes about twenty seconds per garment once it becomes a habit.
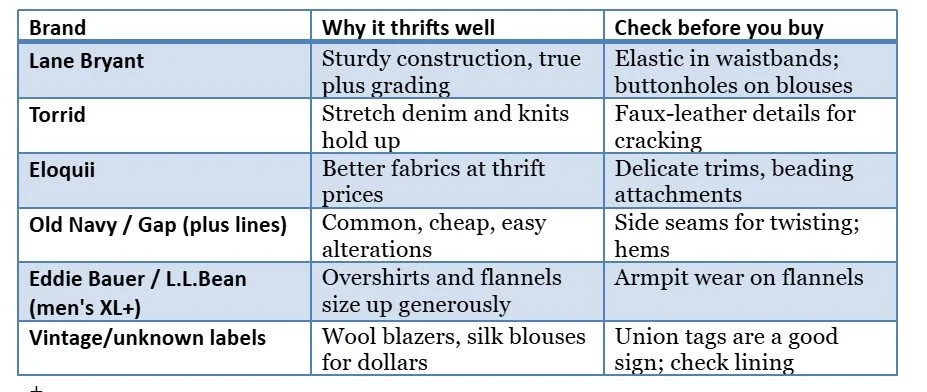
Brands that thrift well in plus sizes
Brand knowledge is a shortcut. Some labels were built for plus bodies with real grading and sturdy construction, and their pieces keep showing up on racks in wearable shape. When I spot these, I stop walking.
One more that earns a grab on sight: Ava & Viv. As I said in my New York Thrift Haul: "Ava and Viv is one of my favorite plus-size brands. Their cotton is just so soft."
Fitting-room strategy
When the cart is full, try the maybe pile first, not the love pile. The loves are coming home unless something is deeply wrong. The maybes are where your time and money get decided.
Run three quick tests on everything:
The sit-down test for pants and skirts. Sit, cross your legs, and stand back up. If you have to shimmy anything back into place, it will annoy you all day.
The raise-your-arms test for blazers, button-downs, and dresses. Reach up like you are grabbing a high shelf. Shoulders and armholes tell the truth fast. Also check if your tummy is showing. If so, it’s probably too short.
The waistband stretch test. Pull the waistband out and release it. A snap back means wear left in it. A slow, crunchy wave means the elastic is done.
Then do the alteration math before you decide. A $4 dress plus a 20-minute waist fix beats a $40 new dress that fits the same. Simple fixes — hems, waist take-ins, a side seam — are worth it. Structural problems are different. Narrow shoulders and small armholes almost never alter well (especially if you’re doing it yourself), so those pieces go back on the rack no matter how pretty they are.
Frequently asked questions
What is the best day to thrift?
Weekday mornings, right after restock, are the sweet spot. Racks are full, aisles are empty, and you are not competing with weekend crowds. Every store has its own rhythm, so ask a staff member which day new racks roll out. Then plan your runs around that day instead of hoping for luck.
Should I try things on over my clothes?
Yep. Leggings and a fitted tank turn any aisle into a fitting room, with no line, no item limit, and no waiting for a key. You will try on roughly three times as much, which means you find the good pieces faster and leave the regrets on the rack where they belong.
What sizes should I check beyond my tag size?
Check two sizes up and one size down from your usual tag. Vanity sizing, decades of different grading, and dryer shrinkage make the printed size a suggestion at best. Your tape measure is the real size chart. A super-stretchy XL can fit like a 2X, and a vintage 18 can fit like a modern 12.
How do I know if something is worth altering?
If the fix takes under 30 minutes, it is usually worth it. Hems, waist take-ins, and side seams all count as quick fixes. Shoulder and armhole work is the exception — it is slow, tricky, and rarely comes out right. A garment that needs a rebuild is a leave-it, however cute it is.
Is ThredUp better than in-store thrifting for plus sizes?
I love both, but they are different games. Online thrifting wins on selection and search filters, and you shop from your couch. In-store wins on fit checks, fabric checks, and price, because you can measure and inspect before you pay. I compare ThredUp, Poshmark, and Goodwill head-to-head in the next post in this series.
What should plus-size thrifters skip?
Skip anything you are buying for the price instead of the garment, and anything with damage you cannot fix yourself. Broken zippers, popped seams at stress points, and dead elastic do not get better at home. If a piece fails the buy-it-or-leave-it checklist, it stays at the store.